


The Ultimate Guide to Choosing the #1 Rice Cooker: Why It’s a Game Changer for Your Kitchen
Welcome to the world of culinary convenience, where perfect rice is just a button away! If you’ve ever struggled cooking rice on the stovetop, you know how tricky it can be. One moment, it’s undercooked and crunchy; the next, it’s an overboiled mess. Enter the #1 rice cooker—a kitchen appliance that promises consistent results with minimal effort.
Imagine fluffy rice grains ready to complement your favorite dishes without endless monitoring or guesswork. A quality rice cooker elevates your meals and frees up time for other culinary adventures (or a well-deserved break). Whether you’re a novice cook or an experienced chef, this handy gadget can revolutionize how you prepare one of life’s most straightforward staples.
Ready to discover why investing in the best rice cooker might be one of your best kitchen decisions yet? Let’s dive into what makes these machines truly game-changers!
The Importance of a Rice Cooker in Your Kitchen
A rice cooker is more than just a cooking device; it’s a kitchen companion. For many, rice is a staple food, forming the base of meals worldwide. A dedicated appliance ensures that this essential dish is cooked perfectly every time.
These machines take the guesswork out of preparing rice. Simple one-touch operation eliminates the need for constant monitoring or adjusting heat levels. This means you can focus on other dishes or enjoy downtime while your rice cooks effortlessly.
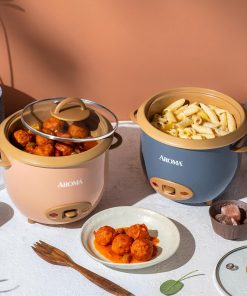
Beyond white and brown rice, modern cookers can handle quinoa, oatmeal, and even steamed vegetables. Their versatility makes them invaluable in any culinary arsenal.
With consistent results and minimal effort required, investing in a quality rice cooker streamlines meal prep while enhancing your dining experience. It’s an upgrade that opens doors to new recipes and delicious possibilities in your kitchen routine.
Features to Consider When Choosing a Rice Cooker
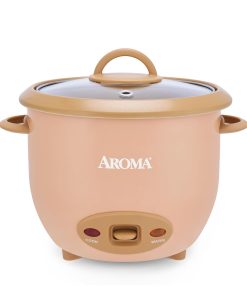
Several key features can make a significant difference when selecting the perfect rice cooker. First, consider capacity. A 5-cup model is ideal for small families, while larger households might need a 10-cup or more.
Next, look for programmable settings. Many cookers offer different options for various types of rice and grains. This versatility ensures your meals are cooked perfectly every time.
Another feature to explore is the keep-warm function. It maintains food at an optimal temperature without overcooking it—great for hectic schedules.
Material also matters; stainless steel interiors are durable and easy to clean compared to non-stick surfaces that may wear down over time.
Check if a steaming tray is included. This handy addition allows you to prepare vegetables simultaneously with your rice—a great way to save time in meal preparation!
How to Use a Rice Cooker: Step-by-Step Guide
Using a rice cooker is simple. Start by measuring out your rice. Typically, one cup of uncooked rice serves about two people.
Rinse the rice under cold water until the water runs clear. This step removes excess starch and prevents stickiness.
Next, place the rinsed rice in the cooker’s inner pot. Add the appropriate amount of water—usually a 1:2 ratio for white rice or adjust based on your type.
Close the lid securely and plug in your cooker. Most models have a primary switch; press it to start cooking.
Wait patiently as it works its magic—it usually takes around 10-20 minutes, depending on the model and type of grain used.
Once done, let it sit for an additional few minutes before opening. Fluff with a fork to separate grains before serving!
Cleaning and Maintenance Tips for Your Rice Cooker
Regular cleaning and maintenance are essential to keep your rice cooker in shape. After each use, allow the oven to cool down before you start cleaning. This helps prevent any burns or damage.
To remove dust and spills, begin by wiping the exterior with a damp cloth. It’s best to hand wash the interior pot using warm soapy water. Avoid abrasive sponges that can scratch its surface; instead, opt for a soft sponge or cloth.
Pay attention to the inner lid if your model has one—this area can trap steam and moisture, leading to mold if not cleaned properly. Remove it according to your manufacturer’s instructions and thoroughly wash it.
Inspect the steaming tray as well; food particles may cling on after cooking. A quick soak in warm water often does wonders for stubborn residues.
After washing, let all parts air dry completely before reassembling them back into the rice cooker. Store your appliance in a dry place away from humidity when not in use.
Regularly check cords and plugs for any wear or damage; safety is paramount in every kitchen gadget you own! Following these simple tips ensures that your #1 rice cooker remains efficient and ready whenever you’re craving perfectly cooked rice again.
Best Embroidery Machines for Creating Professional-Looking Shirts
Are you ready to elevate your shirt game with stunning embroidery? If you’ve ever dreamt of creating professional-looking designs that stand out, you’re in the right place. The best embroidery machine for shirts can turn ordinary fabric into extraordinary art pieces. Finding the perfect machine is crucial whether you’re a hobbyist or looking to start a small business. With so many options on the market, it’s easy to feel overwhelmed. But don’t worry; we’ve narrowed your choices and compiled a list of the top five machines to help you unleash your creativity while ensuring impeccable results. Get ready to explore features, benefits, and insider tips as we guide you through this exciting journey!
Factors to Consider When Choosing an Embroidery Machine
Choosing the proper embroidery machine can feel daunting, but critical factors make it easier. First, consider your sewing experience. Beginners often benefit from user-friendly machines with intuitive controls.
Next, think about the size of your projects. If you plan on creating larger designs or garments, opt for a machine that offers ample hoop sizes and embroidery areas.
Remember to investigate stitch quality and speed. A faster machine may save time but ensure precision in every stitch.
Portability is another factor if you intend to take your machine to craft markets or workshops. Lightweight models are great for easy transport without compromising features.
Check compatibility with design software. Uploading custom designs enhances creativity and lets you personalize shirts like never before.
Comparison of Features and Benefits
When selecting the best embroidery machine for shirts, it is essential to examine key features that enhance usability and precision. Look for machines with multiple needle options. This allows seamless transitions between thread colors, making your designs pop.
Another significant feature is the stitch quality. A good machine will produce clean, consistent stitches even on thicker fabrics. Pay attention to the maximum embroidery area; larger areas offer more design flexibility.
Built-in designs can be a handy bonus for beginners without extensive experience in digitizing artwork. Some models come equipped with user-friendly touchscreens that simplify operation and settings adjustments.
Consider connectivity features like USB ports or Wi-Fi capabilities. These allow you to easily upload custom designs directly from your computer or tablet to the machine, streamlining your creative process.
Customer Reviews and Ratings
Customer reviews and ratings provide invaluable insights into the best shirt embroidery machines. Real users share their experiences, highlighting what works well and where improvements could be made.
Many customers rave about ease of use. They appreciate intuitive interfaces that minimize the learning curve. This feature is especially crucial for beginners looking to create professional designs.
Durability is another common theme in reviews. Users often mention how robust specific models are, making them suitable for heavy usage without breaking down.
The quality of the stitches also garners attention. Reviewers frequently emphasize how intricate patterns appear crisp and clear on fabric, enhancing overall design appeal.
Some users express concerns regarding limited features or software compatibility with specific designs. Understanding these drawbacks helps potential buyers make informed choices tailored to their needs and projects.
Tips for Using an Embroidery Machine for Shirt Designs
A few tips can enhance your experience and results when using an embroidery machine for shirt designs. First, always read the manual carefully before starting. Every machine has unique features that can make or break your project.
Choose high-quality fabrics. This directly impacts how well the design stitches out. Cotton blends are often best for beginners due to their durability and ease of handling.
Use stabilizers wisely. A suitable stabilizer prevents the fabric from stretching or shifting during stitching, ensuring clean lines and crisp details in your embroidery work.
Practice on scrap fabric before tackling your final piece. This helps you familiarize yourself with the machine’s settings and stitch patterns without risking your main project.
Ensure that you’re using the correct needle type for your fabric choice. A sharp needle works great on woven fabrics, while a ballpoint needle is better suited for knits. These tips will help you create beautiful shirts that look professionally done every time!